Anisotropic Filtering On or Off Nvidia: Performance Impact and Visual Quality
- Apr 6
- 14 min read
Anisotropic filtering is one of the most common graphics settings you'll encounter in PC gaming, and understanding whether to enable it through NVIDIA's control panel or leave it off can significantly impact your visual experience. For most modern NVIDIA GPUs, you should keep anisotropic filtering on at 16x, as it dramatically improves texture clarity on angled surfaces with minimal performance cost on current hardware.
The decision between managing this setting through your NVIDIA Control Panel or individual game options depends on your specific situation and preferences. Some users experience better results forcing 16x filtering through NVIDIA's global settings while disabling the in-game option, particularly when games exhibit texture flickering or other visual artifacts.
This guide will walk you through the technical aspects of anisotropic filtering, help you balance image quality against performance demands, and show you how to configure NVIDIA's control panel for optimal results. You'll learn how this setting interacts with other graphics features and discover expert recommendations for different gaming scenarios and hardware configurations.
Anisotropic Filtering: Fundamentals and NVIDIA Implementation
Anisotropic filtering is a texture filtering technique that improves image quality on surfaces viewed at oblique angles, while NVIDIA GPUs implement this through dedicated hardware acceleration and control panel settings. Understanding how these filtering methods work helps you make informed decisions about graphics settings.
What Is Anisotropic Filtering?
Anisotropic filtering preserves texture sharpness and detail when you view surfaces at steep angles in 3D games and applications. Without this filtering, textures on distant or angled surfaces appear blurry or distorted because standard filtering methods sample textures uniformly in all directions.
The technique maintains crisp texture detail at all viewing orientations while providing anti-aliased texture mapping. When you look down a long corridor or across a textured floor in a game, anisotropic filtering prevents the texture from becoming an indistinct blur. It achieves this by taking multiple samples along the axis of maximum change, adapting the filtering pattern to match the orientation of the surface relative to your viewpoint.
The quality levels typically range from 2x to 16x, with higher values providing better image quality at the cost of additional GPU processing. 16x anisotropic filtering offers the best visual results for most gaming scenarios.
How NVIDIA GPUs Handle Texture Filtering
Modern NVIDIA GPUs implement anisotropic filtering through specialized hardware units that accelerate the filtering process. These dedicated components process texture samples efficiently, minimizing the performance impact on your gaming experience.
Your NVIDIA GPU uses texture filtering hardware that works alongside the shader cores to sample and blend texture pixels (texels) before displaying them on screen. The texture units can perform multiple sampling operations simultaneously, allowing for high-quality filtering without severely impacting frame rates.
NVIDIA's implementation includes optimizations like Anisotropic Sample Optimization and Anisotropic Filter Optimization. These features reduce samples based on texel size and limit trilinear filtering to primary stages, balancing performance with visual quality in DirectX applications. The hardware acceleration means you can often enable maximum anisotropic filtering settings with minimal frame rate loss on modern NVIDIA cards.
Types of Texture Filtering: Bilinear, Trilinear, and Anisotropic
Texture filtering methods vary in complexity and quality:
Bilinear filtering samples four nearby texels and blends them together. This provides basic smoothing but can look blurry, especially on angled surfaces. It's the fastest method but offers the lowest quality.
Trilinear filtering extends bilinear filtering by blending between two mipmap levels. Mipmaps are pre-calculated, progressively smaller versions of textures used at different distances. Trilinear filtering eliminates visible transitions between mipmap levels but still struggles with angled surfaces.
Anisotropic filtering adapts its sampling pattern based on surface angle. It retains sharpness that mipmap textures typically lose while attempting to avoid aliasing. Instead of sampling in a square pattern like bilinear or trilinear methods, anisotropic filtering uses an elongated sampling footprint that matches the surface orientation.
Filtering Type | Sample Pattern | Quality | Performance Cost |
Bilinear | Square (4 samples) | Low | Minimal |
Trilinear | Square with mipmap blending | Medium | Low |
Anisotropic | Adaptive elongated pattern | High | Moderate |
Overview of NVIDIA Anisotropic Filtering Options
You can control anisotropic filtering through the NVIDIA Control Panel within the 3D Settings section, though NVIDIA recommends allowing applications to control this setting for best compatibility. The control panel gives you three main options: Application-controlled, Off, or force a specific level (2x, 4x, 8x, or 16x).
When you select Application-controlled, games determine their own anisotropic filtering settings through their graphics menus. This typically provides the best compatibility but means you must adjust settings individually per game.
Forcing anisotropic filtering through the NVIDIA Control Panel overrides in-game settings. Many users prefer this approach because it ensures consistent filtering across all games, including older titles that may lack proper anisotropic filtering options. You set it once globally and don't need to configure individual games.
The forced setting applies 16x anisotropic filtering (or your chosen level) to all games, which can eliminate flickering issues that sometimes occur with in-game filtering options. Your NVIDIA driver handles the filtering at the driver level, which can be more reliable than game-specific implementations.
Anisotropic Filtering On or Off: Image Quality Versus Performance
Enabling anisotropic filtering sharpens textures viewed at angles while adding minimal GPU load, though the trade-off between visual clarity and frame rate varies based on your hardware and resolution settings.
Visual Impact: Clarity, Sharpness, and Texture Detail
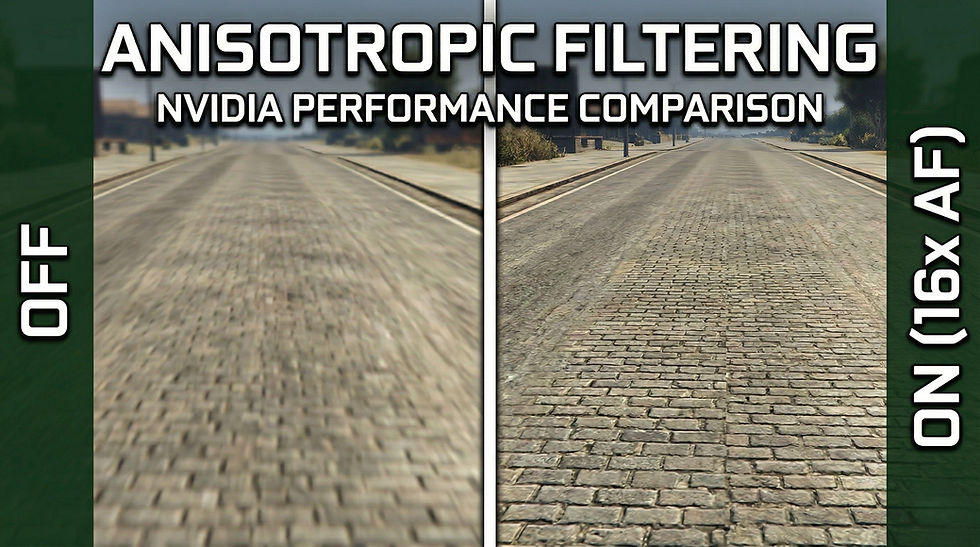
Anisotropic filtering modifies texture appearance based on viewing angle rather than swapping in higher-resolution versions. When you enable this setting, surfaces like roads, floors, and walls extending into the distance maintain crisp detail instead of appearing blurry or muddy.
The difference between off and 16x becomes immediately noticeable on angled surfaces. Textures retain their sharpness and definition as they recede from your viewpoint. This improvement in image quality affects every scene where you're looking down corridors, across terrain, or at any surface that isn't perpendicular to your camera.
Lower settings like 2x or 4x provide minimal visual enhancement compared to higher values. The jump from off to 8x or 16x delivers the most significant improvement in texture detail and overall visual fidelity during gameplay.
Performance Considerations: Frame Rate and GPU Usage
Modern GeForce GPUs handle anisotropic filtering efficiently due to hardware optimizations. The performance impact typically ranges from negligible to moderate depending on your resolution and texture quality settings.
At 1080p or 1440p resolutions, enabling 16x anisotropic filtering rarely causes noticeable frame rate drops on mid-range or high-end cards. However, 4K gaming with high-quality textures can produce measurable GPU usage increases. Some users report that reducing from 16x to 8x maintains similar visual quality while improving gaming performance at higher resolutions.
The actual frame rate impact depends on your specific hardware configuration and game optimization. Testing different levels lets you find the balance between visual enhancement and maintaining your target FPS.
Recommended Scenarios: When to Enable or Disable
You should enable anisotropic filtering at 8x or 16x if your system maintains acceptable frame rates. The visual improvement justifies the minor performance cost in most gaming scenarios, particularly in open-world games or titles with detailed ground textures.
Disable or reduce anisotropic filtering below 4x only when you need to increase FPS on lower-end hardware. Older GPUs or systems struggling to maintain 60 FPS at your chosen resolution benefit from turning this setting down or off entirely.
When to use specific levels:
16x: High-end GPUs, 1080p/1440p gaming, prioritizing image quality
8x: Balanced setting for 4K gaming or mid-range cards
4x or lower: Budget GPUs, VR applications needing consistent frame rates
Off: Severe performance constraints only
Comparing NVIDIA, In-Game, and Global Application Settings
You can control anisotropic filtering through NVIDIA Control Panel's Manage 3D Settings or individual game options. Some users prefer forcing 16x through NVIDIA settings rather than using in-game controls for consistent quality across titles.
Setting the global application in NVIDIA Control Panel applies filtering to all games unless they override it. This approach ensures consistent texture quality but removes per-game flexibility. The NVIDIA driver implementation sometimes differs slightly from in-game filtering methods.
In-game settings give you granular control for specific titles. Games with well-optimized filtering may perform better using their native options rather than forcing NVIDIA settings. Testing both approaches reveals which method provides better gaming performance for your configuration.
NVIDIA Control Panel override options:
Application-controlled: Game decides filtering level
Off: Forces filtering off globally
2x through 16x: Overrides all game settings
Your choice between methods depends on whether you want universal consistency or game-specific optimization.
NVIDIA Control Panel: Managing Anisotropic Filtering Settings
The NVIDIA Control Panel gives you direct control over anisotropic filtering through both global and per-application settings, allowing you to override in-game options or leave filtering decisions to individual games.
Accessing the Control Panel
You can open the NVIDIA Control Panel through Windows' standard Control Panel or by right-clicking on your desktop and selecting it from the context menu. Once opened, navigate to the left sidebar and look for the "3D Settings" section.
Click on Manage 3D Settings to access all graphics options including anisotropic filtering controls. This is where you'll find both global settings that apply to all applications and program-specific settings for individual games.
The interface displays a list of graphics features in the center of your screen. You need a GeForce graphics card with current NVIDIA drivers installed for these options to appear correctly.
Global Settings Versus Program Settings
The Manage 3D Settings page offers two tabs at the top: Global Settings and Program Settings. Global Settings apply your chosen anisotropic filtering level to every application and game on your system.
Program Settings let you customize anisotropic filtering for specific games or applications. You can select the game under 'Program to customize' or manually add an executable using the 'Add' button if your game doesn't appear in the list.
This distinction matters because you might want 16x filtering for older games with poor built-in options while letting modern titles handle their own filtering. Program-specific settings always override global settings for that particular application.
How to Override or Enhance In-Game Filtering
In the settings list, locate Anisotropic Filtering and click the dropdown menu to its right. You can choose to let the application determine the settings, turn it completely off, or select from available settings ranging from 2x to 16x.
Selecting "Application-controlled" allows games to use their built-in anisotropic filtering options. Choosing a specific value like 8x or 16x forces that filtering level regardless of in-game settings.
Some users prefer to turn off in-game anisotropic filtering and use the NVIDIA settings at 16x for consistent results across all games. This approach works well for older titles or games with limited graphics options.
Best NVIDIA Control Panel Settings for Anisotropic Filtering
The optimal anisotropic filtering setting depends on whether your games have robust built-in filtering options. It is recommended to leave this setting turned OFF or set to a low value like 2x or 4x in the NVIDIA Control Panel, as most modern games include their own efficient anisotropic filtering controls.
For newer games released after 2015, set anisotropic filtering to Application-controlled in your global settings. This lets each game use its optimized filtering implementation, which typically performs better than driver-level forcing.
For older games or titles with poor texture quality, consider setting anisotropic filtering to 8x or 16x through program-specific settings. The performance impact is minimal on modern GPUs, and the visual improvement in texture sharpness at oblique angles is noticeable.
You can also adjust related settings like Texture Filtering - Quality to "High quality" for better results, as these options don't significantly affect performance. Always click "Apply" after making changes to ensure your settings take effect.
Advanced Texture Filtering and Related NVIDIA Features
NVIDIA's control panel offers several texture filtering options beyond basic anisotropic filtering that can impact both image quality and performance. These settings work together to control how textures are processed and displayed, with options for optimization, sharpness adjustment, and integration with modern upscaling features.
Trilinear Optimization and Anisotropic Sample Optimization
Trilinear optimization and anisotropic sample optimization are controlled by the main texture filtering quality setting in NVIDIA Control Panel. These optimizations improve performance by reducing the computational workload during texture filtering operations.
Trilinear optimization works by limiting trilinear filtering to the primary texture stage where the general appearance and color of objects is determined. This reduces processing on secondary texture stages without significantly affecting visual quality. Anisotropic sample optimization similarly reduces the number of texture samples needed during anisotropic filtering.
You can control these through the "Texture Filtering - Quality" option, which offers settings ranging from "High Quality" to "Performance." The quality setting disables optimizations for maximum fidelity, while performance mode enables both optimizations for faster rendering.
Negative LOD Bias and Clamp Settings
LOD (Level of Detail) bias controls texture sharpness by adjusting which mipmap level the GPU selects during rendering. Negative LOD bias forces the GPU to use higher-resolution mipmaps, creating sharper textures at the cost of performance and potential aliasing artifacts.
The "Texture filtering - Negative LOD bias" setting in NVIDIA Control Panel should typically remain on "Clamp" for proper functionality. Clamp prevents applications from using negative LOD bias values that could make textures overly sharp or cause visual artifacts. Allowing negative LOD bias can sometimes improve texture clarity but may introduce shimmering or other unwanted effects. Your GPU's default clamp setting ensures compatibility with games while preventing excessive sharpening that could degrade image quality.
Texture Filtering Settings and Fine-Tuning
The texture filtering options in NVIDIA Control Panel provide granular control over rendering quality and performance balance. You can adjust these settings globally or on a per-application basis by selecting specific game executables.
Key texture filtering options include:
Anisotropic filtering: Controls the level of filtering applied (off, 2x, 4x, 8x, 16x)
Texture filtering - Quality: Balances performance and quality
Texture filtering - Trilinear optimization: Separate control when quality is set to "High performance"
Texture filtering - Anisotropic sample optimization: Available under quality settings
When you set texture filtering quality to "High performance," you gain access to individual optimization toggles. This allows you to enable specific optimizations while maintaining others at quality settings.
Interactions with Image Sharpening and Scaling
Modern NVIDIA features like image sharpening and AI-based scaling technologies interact with texture filtering settings in ways that affect final image quality. Image sharpening applies post-processing to enhance edge clarity, which can complement or conflict with your texture filtering configuration.
When you combine forced anisotropic filtering with NVIDIA's image sharpening, you may achieve better texture clarity without relying on negative LOD bias. Upscaling technologies like DLSS render at lower resolutions before scaling up, making texture filtering even more important for maintaining detail in the upscaled image.
Shader cache and shader cache size settings don't directly affect texture filtering but impact overall performance. The shader cache stores compiled shaders to reduce loading times and stuttering, which becomes more valuable when using demanding texture filtering settings like 16x anisotropic filtering.
Integrating Anisotropic Filtering with Other NVIDIA 3D Features
Anisotropic filtering works alongside multiple NVIDIA graphics settings that affect image quality and performance. Balancing texture filtering with antialiasing, synchronization technologies, and power settings determines your overall gaming experience.
Anti-Aliasing Techniques: FXAA, MSAA, MFAA, and TAA
You can combine anisotropic filtering with various antialiasing methods in your NVIDIA Control Panel. Each technique addresses different visual artifacts while consuming varying levels of GPU resources.
FXAA (Fast Approximate Anti-Aliasing) applies a post-processing filter that smooths jagged edges with minimal performance impact. This method works independently of anisotropic filtering and adds little overhead to your frame rate.
MSAA (Multi-Sample Anti-Aliasing) samples multiple points per pixel to reduce edge aliasing. When you enable both MSAA and 16x anisotropic filtering, expect a more significant performance reduction than using either setting alone.
MFAA (Multi-Frame Anti-Aliasing) combines samples across frames to achieve MSAA-like quality with better performance. NVIDIA designed this technique for Maxwell and newer architectures, making it compatible with anisotropic filtering without requiring application-level support.
TAA (Temporal Anti-Aliasing) analyzes previous frames to smooth edges and reduce shimmering. You'll find TAA commonly built into games rather than controlled through NVIDIA settings, though it pairs well with driver-level anisotropic filtering.
Ambient Occlusion and Its Effects
Ambient occlusion adds realistic shadows to corners and crevices where objects meet. NVIDIA offers several ambient occlusion methods through the Control Panel that complement anisotropic filtering.
HBAO+ (Horizon-Based Ambient Occlusion Plus) delivers high-quality shadow detail with moderate GPU usage. When you enable this alongside 16x anisotropic filtering, textures appear sharper while shadowed areas gain depth.
Screen Space Ambient Occlusion (SSAO) provides a lighter alternative that works well when you want to maintain higher frame rates. The combination of SSAO and anisotropic filtering improves visual quality without the performance penalty of HBAO+.
You should note that ambient occlusion settings don't directly interact with texture filtering. Both features independently enhance image quality by addressing different visual elements.
Vertical Sync, G-SYNC, and Refresh Rate Impacts
Vertical sync technologies control how your GPU delivers frames to your display. These settings interact with anisotropic filtering by managing the overall frame delivery pipeline.
V-Sync locks your frame rate to your monitor's refresh rate, eliminating screen tearing. When you apply anisotropic filtering with V-Sync enabled, the GPU must complete texture filtering within the refresh window to avoid stuttering.
G-SYNC and Adaptive Sync dynamically adjust your monitor's refresh rate to match GPU output. These monitor technologies provide smoother gameplay even when anisotropic filtering causes frame rate fluctuations.
You'll find that higher refresh rate displays (144Hz, 240Hz) benefit more from anisotropic filtering than 60Hz monitors. The improved texture clarity becomes more noticeable at higher frame rates where motion appears smoother.
ULMB (Ultra Low Motion Blur) cannot run simultaneously with G-SYNC, requiring you to choose between reduced motion blur and adaptive refresh rates when configuring anisotropic filtering settings.
Power Management, Latency, and Background Performance
Power management settings in NVIDIA Control Panel determine how aggressively your GPU processes texture filtering operations. Your choice affects both performance consistency and system responsiveness.
The Prefer Maximum Performance mode keeps your GPU at higher clock speeds, ensuring anisotropic filtering receives consistent processing power. This setting eliminates clock speed ramping but increases power consumption and heat output.
Optimal Power allows the GPU to adjust clock speeds based on workload. When you enable anisotropic filtering under this mode, brief performance variations may occur as the card responds to changing texture demands.
Low Latency Mode reduces input lag by limiting frame queuing. Setting this to Ultra alongside anisotropic filtering can improve responsiveness in competitive games where you need sharp textures and minimal delay.
Background Application Max Frame Rate limits GPU usage when games run in the background. This setting prevents anisotropic filtering from consuming resources when you're not actively playing, though it doesn't affect foreground performance.
Expert Tips on Optimal NVIDIA Settings for Anisotropic Filtering
NVIDIA Control Panel offers multiple approaches to configure anisotropic filtering, with performance impact varying based on your hardware and whether you enable it globally or per-application. The key is understanding how different rendering APIs handle the setting and monitoring the actual impact on your specific games.
Balancing Performance and Quality for Gaming
Setting anisotropic filtering to 16x in the NVIDIA Control Panel typically delivers minimal performance impact on modern GPUs while providing maximum texture clarity. Most gaming optimization guides recommend 16x since the visual improvement outweighs the negligible frame rate cost.
You can access these controls through Manage 3D Settings in the NVIDIA Control Panel. NVIDIA officially recommends application-controlled settings for best compatibility, but many games have less efficient built-in implementations than the driver-level option.
For maximum performance, you should configure the preferred graphics processor to use your high-performance NVIDIA processor rather than integrated graphics. This ensures anisotropic filtering runs on dedicated hardware. Consider testing both global settings and program settings for individual games, as some titles show better results with in-game controls while others benefit from forced driver settings.
When optimizing for competitive gaming, monitor your results alongside other settings like maximum pre-rendered frames (set to 1 for lowest latency) and enable DLSS if available to recover any lost performance from quality enhancements.
Compatibility with Direct3D, OpenGL, and Vulkan
Direct3D applications generally handle driver-forced anisotropic filtering well across DirectX 10 and newer versions. The NVIDIA driver intercepts texture calls and applies filtering without compatibility issues in most modern games.
OpenGL applications require specific attention to the OpenGL rendering GPU setting. You must ensure your dedicated GPU is selected rather than integrated graphics, or the filtering settings may not apply correctly. Some older OpenGL games show artifacts when forcing anisotropic filtering through the driver.
Vulkan applications typically ignore driver-level anisotropic filtering settings because the API gives developers more direct hardware control. You'll need to use in-game settings for Vulkan titles like DOOM Eternal or Red Dead Redemption 2. Testing both approaches reveals which method works for each API.
For best results across all rendering APIs, start with application-controlled settings and only force driver-level filtering when games lack built-in options or show poor implementation.
Considerations for VR, Multi-Monitor, and HDMI Setups
Virtual reality applications demand special attention to the virtual reality pre-rendered frames setting, which should typically stay at 1 to minimize latency. Anisotropic filtering at 16x works well in VR since texture clarity at oblique angles directly impacts immersion and comfort.
Multi-monitor configurations benefit from checking GPU scaling settings to ensure anisotropic filtering applies uniformly across all displays. Dynamic Super Resolution can combine with 16x anisotropic filtering for enhanced visual quality, though this significantly increases GPU load.
HDMI connections may introduce additional latency that compounds with filtering overhead. Monitor for screen tearing when enabling both anisotropic filtering and other intensive settings, especially at high refresh rates. You can cap frame rates using the Max Frame Rate setting to prevent tearing without enabling V-Sync.
VR headsets require consistent frame times more than maximum FPS, so test anisotropic filtering alongside other settings to maintain your target refresh rate (90Hz, 120Hz, or 144Hz depending on your headset).
Monitoring and Benchmarking Results
Use MSI Afterburner to track GPU utilization, frame times, and temperatures while testing different anisotropic filtering configurations. The OSD overlay shows real-time performance metrics during gameplay without interrupting your testing.
Run built-in game benchmarks with anisotropic filtering at Application-controlled, Off, and 16x to measure actual impact. Record 1% and 0.1% low frame rates, not just average FPS, since these metrics reveal stuttering issues. Most modern GPUs show less than 3-5% performance difference between Off and 16x.
Compare rendering performance across different games and APIs in your library. DirectX titles may show different results than OpenGL games with identical settings. Document which games benefit from driver-forced filtering versus in-game controls.
Create baseline measurements before changing multiple settings simultaneously. Adjust anisotropic filtering first, benchmark it, then modify other options to isolate each setting's impact on your specific hardware configuration.


Comments